 Ben
Ben
Best Answer
This IDAutomation user guide explains how to produce barcodes in BI Publisher for Oracle developers who use E-Business Suite. Only developers with BIP report design, XML, and Java experience must perform the solution. Only developers with BIP report design, XML, and Java barcode encoder experience must perform the solution. IDAutomation only supports the Java barcode encoder available through our company. To troubleshoot barcode generation issues in BIP, ensure the Java barcode encoder performs in a stand-alone application (an example is included in the product). If the Java barcode encoder performs in a stand-alone application but does not function in BIP, contact Oracle Support for more information.
The Java barcode encoder solution works with Oracle E-Business Suite (EBS) to print barcodes in BI/XML Publisher Reports which may be generated from the E-Business Suite concurrent program.
-INSTALL FONTS-
1. Install all BI Publisher requirements (Bi Publisher, Microsoft Word).
2. Purchase, download, and extract the IDAutomation_GS1DataMatrixFontEncoderSuite.zip (Developer License or greater)
3. To install the IDAutomation2D font, run the IDAutomation_DataMatrixFontEncoder.exe or manually install the font located :
OPTION 1 Install using EXE
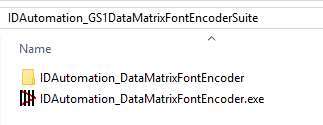
OPTION 2 Manually install Fonts

-SET UP JAVA CLASS-
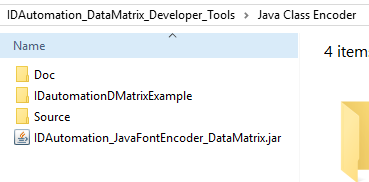
4. Download and install the Data Matrix Developer Tools from the IDAutomation store and extract the zip.
5. Locate the IDAutomation_JavaFontEncoder_DataMatrix.jar and set up the file in your environment.
NOTE: Prior to implementing the solution in BI Publisher, confirm that you can create a Data Matrix barcode in a stand-alone application/project. If not, ensure that the Data Matrix class file is part of the classpath within your Environment Variables.
-CREATE BARCODEUTIL.CLASS-
6. Download the IDAutomation_BIPublisher_DataMatrix.zip available at the top of the post. It includes the barcodeutilDataMatrix.java and dependencies (Logger.class and XDOBarcodeEncoder.class) for creating the barcodeutilDataMatrix.class.
7. Open the barcodeutilDataMatrix.java file. The Encoder section of the tutorial provides an example of the parameters. Update the parameters in the .java file based on the barcode requirements:
/* Import the idautomation encoder class */
import com.idautomation.fontencoder.datamatrix.*;
DataMatrixEncoder dme = new DataMatrixEncoder();
boolean processTilde = false;
int encoding = 0;
int preferredFormat = -1; //Auto
return dme.fontEncode(DataToEncode);
Class[] clazz = new Class[] { "".getClass() };
ENCODERS.put("dmatrix" , mUtility.getClass().getMethod("dmatrix" , clazz));
8. Compile the barcodeutilDataMatrix.java file to create the barcodeutilDataMatrix.class.
-SET UP JAR FILES-
9. Access the jlib path and reference the listed JAR files in the classpath:

- xdocore.jar
- xmlparserv2.jar
- collections.jar
- aolj.jar
- share.jar
- xdoparser.jar
- jewt4.jar
- 18nAPI_v3.jar
10. Place the barcodeutilDataMatrix.class into the barcodejar.jar.
11. Copy the IDAutomation_DataMatrix_JavaFontEncoder.jar and the barcodejar.jar to the jlib folder within the Template Builder for Word.
12. Place the JARs into the RTF2PDF.jar, located in the jlib folder. In newer versions of BI Publisher, the JAR is named RTF2PDFv2.jar, it functions the same.
13. Make a backup of the RTF2PDF.jar file.
14. Open the RTF2PDF.jar using Winzip or 7-zip and access the META-INF directory. Open and edit the MANIFEST.MF to include the jars at the end of the classpath list:
Manifest-Version: 1.0
Class-Path: ./activation.jar ./mail.jar ./xdochartstyles.jar ./bicmn.jar ./jewt4.jar
./share.jar ./bipres.jar ./xdoparser.jar ./xdocore.jar ./xmlparserv2.jar
./xmlparserv2-904.jar ./i18nAPI_v3.jar ./versioninfo.jar
./barcodejar.jar ./IDAutomation_JavaFontEncoder_DataMatrix.jar
Main-Class: RTF2PDF
-SET UP TO RENDER BARCODE-
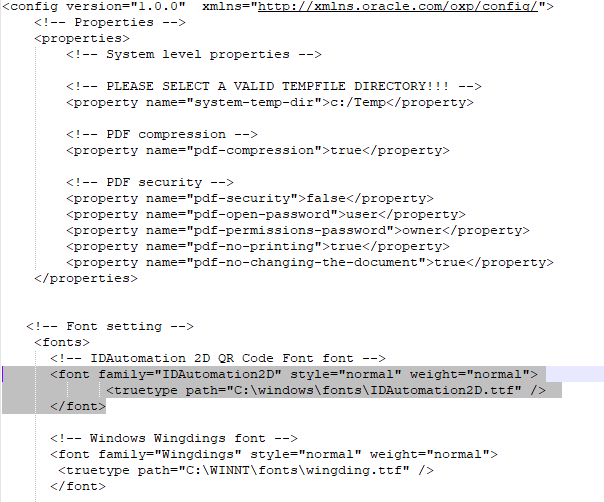
15. To render the barcode in a PDF report, reference the font within a config file in the BI Publisher config folder. Open the xdo example.cfg file located:

16. Add an entry for the IDAutomation2D font in the code area under the font setting:
-WORD SET UP-
17. In Word, access the BI Publisher file. Double-click the field to the barcode and choose Add Help Text to open the Form Field.
18. In the Status Bar tab, enter the first command:
<?register-barcode-vendor:'ENCODER WRAPPER CLASS'; 'ENCODER NAME'?>
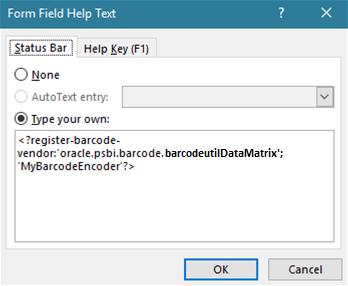
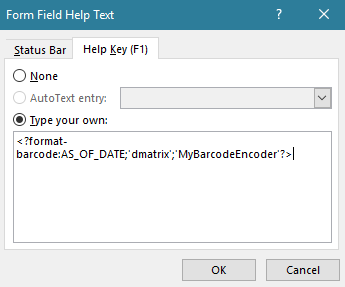
19. In the Help Key (F1), enter the second command:
<?format-barcode:DATA_TO_ENCODE;'ENCODER_METHOD_NAME';'ENCODER_NAME'?>
20. To confirm the Java barcode font encoder encodes the data, view the document (PDF, RTF, HTML):

21. Return to the project and select the IDAutomation2D font from the font list. View the document.

 Posted 5.6 year(s) ago Posted 5.6 year(s) ago
|


 Email this question link to friends